Welcome, fellow homeowners! If you’ve been pondering ways to make your home more comfortable and energy-efficient, you’re in the right place. Today, we’re diving into the world of underfloor insulation—a game-changer for maintaining cozy temperatures and reducing energy bills in your Aussie abode.
Measuring Up: How to Assess Your Underfloor Area
Before diving into the nitty-gritty of underfloor insulation, let’s ensure we’re on the same page regarding measurements.
There are a few ways to get your floor area:
- Use a commercial real estate site
- Measure it yourself – inside your home
- Measure it yourself – outside your home
1. Look up commercial sites
Sites like www.realestate.com.au, www.domain.com.au or www.allhomes.com.au generally provide floor measurements but there is no guarantee about their accuracy. You might like to use them as a guide and then measure them yourself.
2. Measure it yourself – inside your home
To measure a floor area accurately requires a systematic approach. You’ll need a measuring tape, preferably a long one for larger areas, and a pencil and paper to sketch out the floor shape and jot down measurements. To find the area of a rectangular, multiply the length by the width. If the floor area is complex or irregularly shaped, break it down into simpler shapes like rectangles or squares. This will make measuring easier. Begin at one corner of the room and measure along one edge. If the floor is irregularly shaped, measure along each edge. Make sure to extend the tape measure all the way to the opposite edge, ensuring it’s straight. Note down the length of each edge or side of the floor area.
3. Measure it yourself – outside your home
You will need a very long tape measure to measure the external perimeter of your home. If the floor area is complex or irregularly shaped, break it down into simpler shapes like rectangles or squares.
If it is a weatherboard home, the outside measurements will be the correct measurements. If it is a brick veneer home, you need to subtract 320mm from each external measurement because – you need to subtract the width of the brick (110mm) and the cavity (50mm) from each end of the measurement.
Once you have your measurements, to find the area of a rectangular, multiply the length by the width. For irregular shapes, break them down into simpler shapes (like rectangles) and calculate the area of each section separately. Then add all the areas together. Double-check your measurements to ensure accuracy. It’s a good idea to measure each side more than once to confirm. Round your final measurement up to the nearest square square metre for simplicity. Once you’ve calculated the total floor area, document it for future reference.
The average area of an older home is around 120m2.
Measuring Up: How to Assess Your Joist Width
Now you have your underfloor area, it’s important to assess the most common joist spacing in your subfloor. Most commonly joists will be set at 450mm centres (leading edge of one joist to leading edge of the next joist). However, it’s a little bit trickier than that. What we really need to find out is what the space between the joists is. This can be different depending on the width of the joist timbers.
Many older homes in NSW and Queensland have quite thick joists and therefore the space left between the joists is typically 405 to 410mm.
Older homes in Victoria and newer homes in most places will have narrower joists and so the space left between the joists is typically 430mm.
It may not sound like a big difference but it’s enough to make your job harder than it needs to be if you select the wrong width insulation. If you’re unsure about your joist spacing, fear not. You can easily measure it yourself.
Grab a measuring tape and head beneath your house. Measure the gap between the joists—the wooden beams supporting your floorboards. This measurement will dictate the STARTING POINT for working out what width of insulation is needed to snugly fit between the joists. From that measurement, ADD 20MM. This allows for your underfloor insulation to fit snugly and have enough roof to allow for the staples to be securely stapled to each joist.
Note that every underfloor will have some joist spacings that do not conform to the most common spacing. That’s OK, they are easy to deal with but we are looking for the most common spacing.
Choosing the Right Width of Insulation
Now that you’ve determined your joist spacing, it’s time to select the appropriate insulation. ecoMaster offers a range of polyester underfloor insulation products tailored to various joist widths. Referencing the specs tab on each product can help you pinpoint the perfect fit for your home.
As a quick reference:
Value Poly (Victoria only) comes in 450mm wide (R2.5, R3 and R4)
This is suitable for joists that have a gap between them of 430mm
CSR Polymax (available Australia-wide) comes in 430mm and 450mm wide. (R2.5)
This gives you the options of:
430mm wide for joists spaced at 410mm
450mm wide for joists spaced at 430mm
We also offer Value Poly in 600mm wide (R2.0) suitable for joists that are spaced 580mm apart.
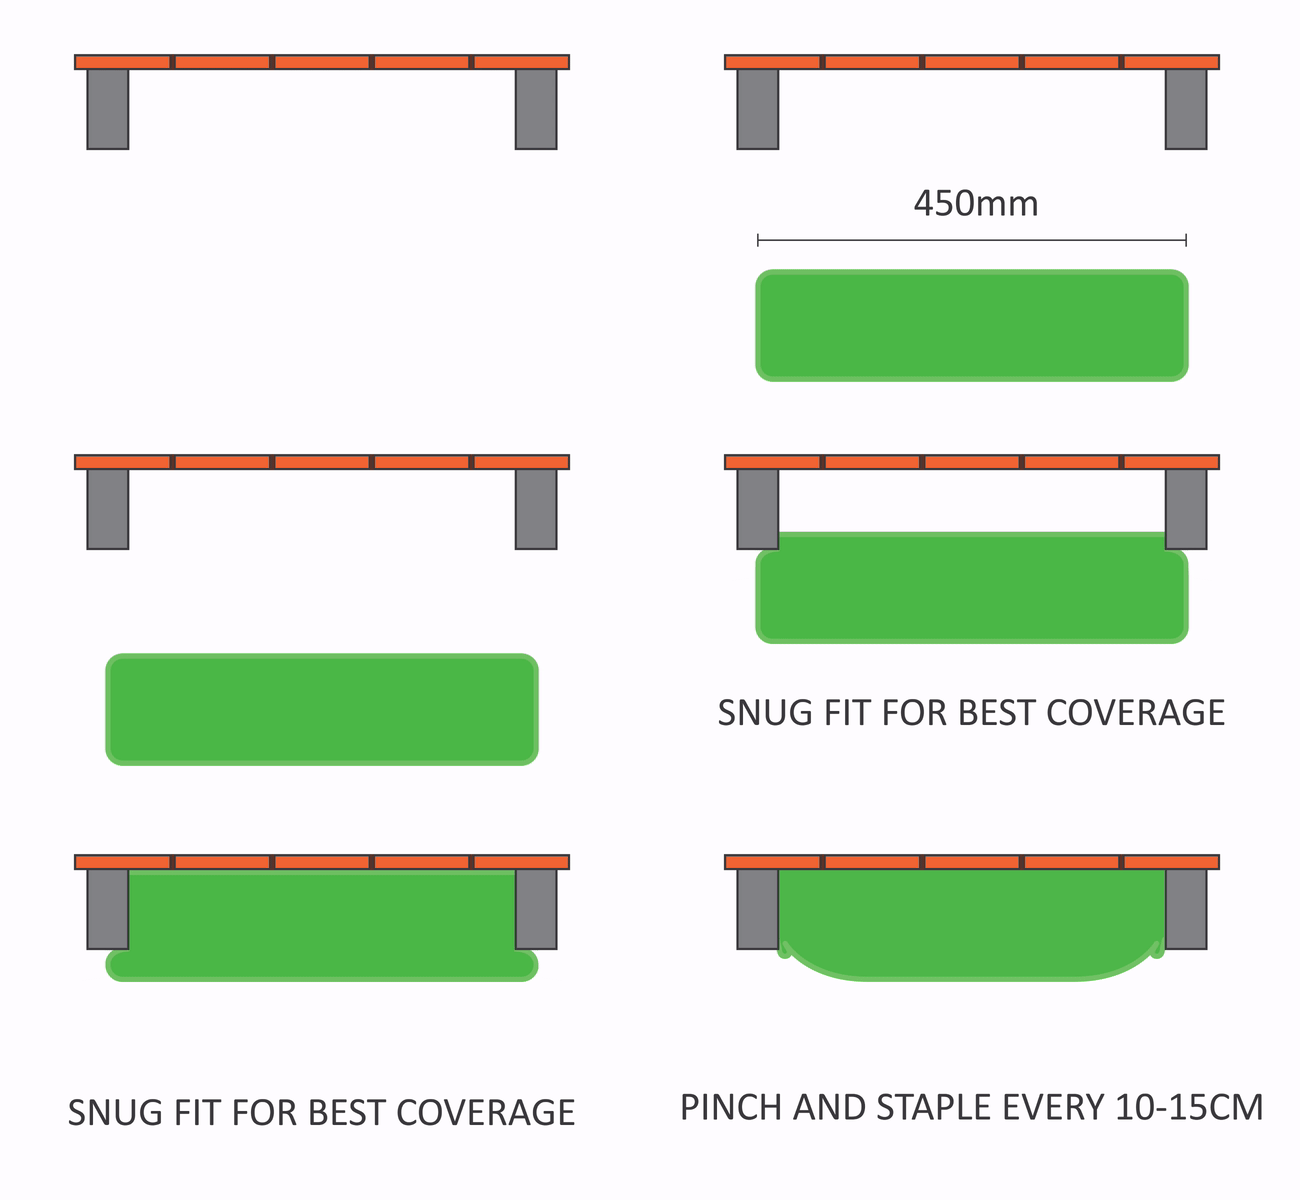
The easiest way to explain why it’s so much better to have the insulation a little wider than the space is to take you through how to install insulation the ecoMaster way:
- First, we tuck one end of the roll above the bearer and then we press the insulation up in between the joists. At the other end of the joist space we tear off the section from the roll and tuck it up above the bearer at the other end. The additional width makes the material fit snuggly, making excellent contact with the floor and holding it in place while it is stapled in place.
- Next, we pinch and staple the material to the inside edge of the joist. This causes the insulation to “pillow” slightly, giving you the extra benefit of 120 mm thick insulation even though a standard joist is only 90 mm deep.
Remember, the goal is to fill the space between the joists completely, ensuring maximum coverage and efficiency. Opting for insulation that matches your joist width minimizes gaps and maximizes thermal performance.


Calculating How Many Packs You Will Need
Once you’ve identified the right insulation width, it’s essential to calculate how much you’ll need for your entire underfloor area. This step is crucial for budgeting and ensuring you purchase the correct quantity of insulation.
To determine the quantity required consult the Underfloor Insulation Ready Reckoner to ascertain how many bags of your preferred insulation you will need.
Then pop over to the ecoMaster Store to place your order.
Dealing with Irregular Joist Spacing: Turn and Tear Technique
Encountering joists with uneven spacing is a common challenge during underfloor insulation installation. Fortunately, there’s a simple technique to address this issue: the turn and tear method.
Don’t bunch it up!
If you are inclined to “best guess” your joist width and then shove your oversized insulation into the joist gap, please be aware. Whilst rodents don’t like it, won’t eat it and won’t take it away, if you create a cradle for them to visit, they may drop by and say Hi.
You need to have your underfloor insulation to be fitted firmly and evenly under the floorboards (as per our image). This means there is no space for rodents to pop by.
Investing in Energy Efficiency: A Wise Decision
In times of rising costs and economic uncertainty, investing in energy efficiency is a prudent choice. Underfloor insulation serves as a formidable ally, offering numerous benefits that extend beyond comfort.
By effectively insulating your underfloor space, you create a thermal barrier that prevents heat loss during chilly winters and heat gain on scorching summer days. This translates to reduced reliance on heating and cooling systems, leading to significant savings on energy bills. In a time of unplanned power outages, a home that can maintain its temperature when there is no access to power will bring its own benefits.
Moreover, enhancing your home’s energy efficiency reduces your carbon footprint—a small yet impactful step toward environmental sustainability.
As Australian homeowners navigate the realm of energy efficiency, underfloor insulation emerges as a very sensible thing to do (after draught proofing and ceiling insulation). By measuring up, selecting the right insulation, calculating your needs, and embracing its benefits, you pave the way for a more comfortable, cost-effective, and sustainable home.
Ready to embark on your underfloor insulation journey? Visit www.ecoMaster.com.au to explore a myriad of insulation options tailored to your needs. Remember, a well-insulated home isn’t just a haven—it’s a wise investment for the future.
Happy insulating!
What’s Next?
We hope this article has helped you learn how to use simple ways to save on your utility bill. This in turn will help you on your energy and thermal efficiency retrofit journey to make your home more comfortable all year round, and reduce your costs and carbon emissions.
Next, explore how to install underfloor insulation.
If you found this article helpful, then please subscribe to our YouTube Channel. You’ll find many more helpful “How To” videos there. You can also follow us on Facebook and Instagram to stay in the loop. For more great information on how to make your home more energy and thermally efficient subscribe NOW to ecoBites. ecoBites are free bite size chunks of the latest energy efficiency information making it quick and easy for you to absorb.

Recent Comments